Markdown Documents and Typora

Markdown documents are text files with formatting hints to make them readable. When you view a program checked-in at GitHub, for example, the README file is usually in Markdown format (with file extension .md, like README.md).

Recently, I was dealing with a bunch of Markdown documents, including ones I authored for personal use, that I searched for editors that can render the formatting of Markdown documents. I found the Typora editor suited my needs.

Typora made it easy to author formatted Markdown documents because it renders the formatted document. Here’s a screenshot of a Markdown document containing text copied from a browser:

Typora rendering a Markdown document

You can have syntax highlighting for code, tables, and even diagrams (via the Mermaid diagramming tool included in Typora).

Diagrams rendered by Mermaid tool

The site https://mermaid.ai/open-source/intro/ has a number of examples. Below is an example Markdown text file with formatting hints.

## 1. Flowchart Example

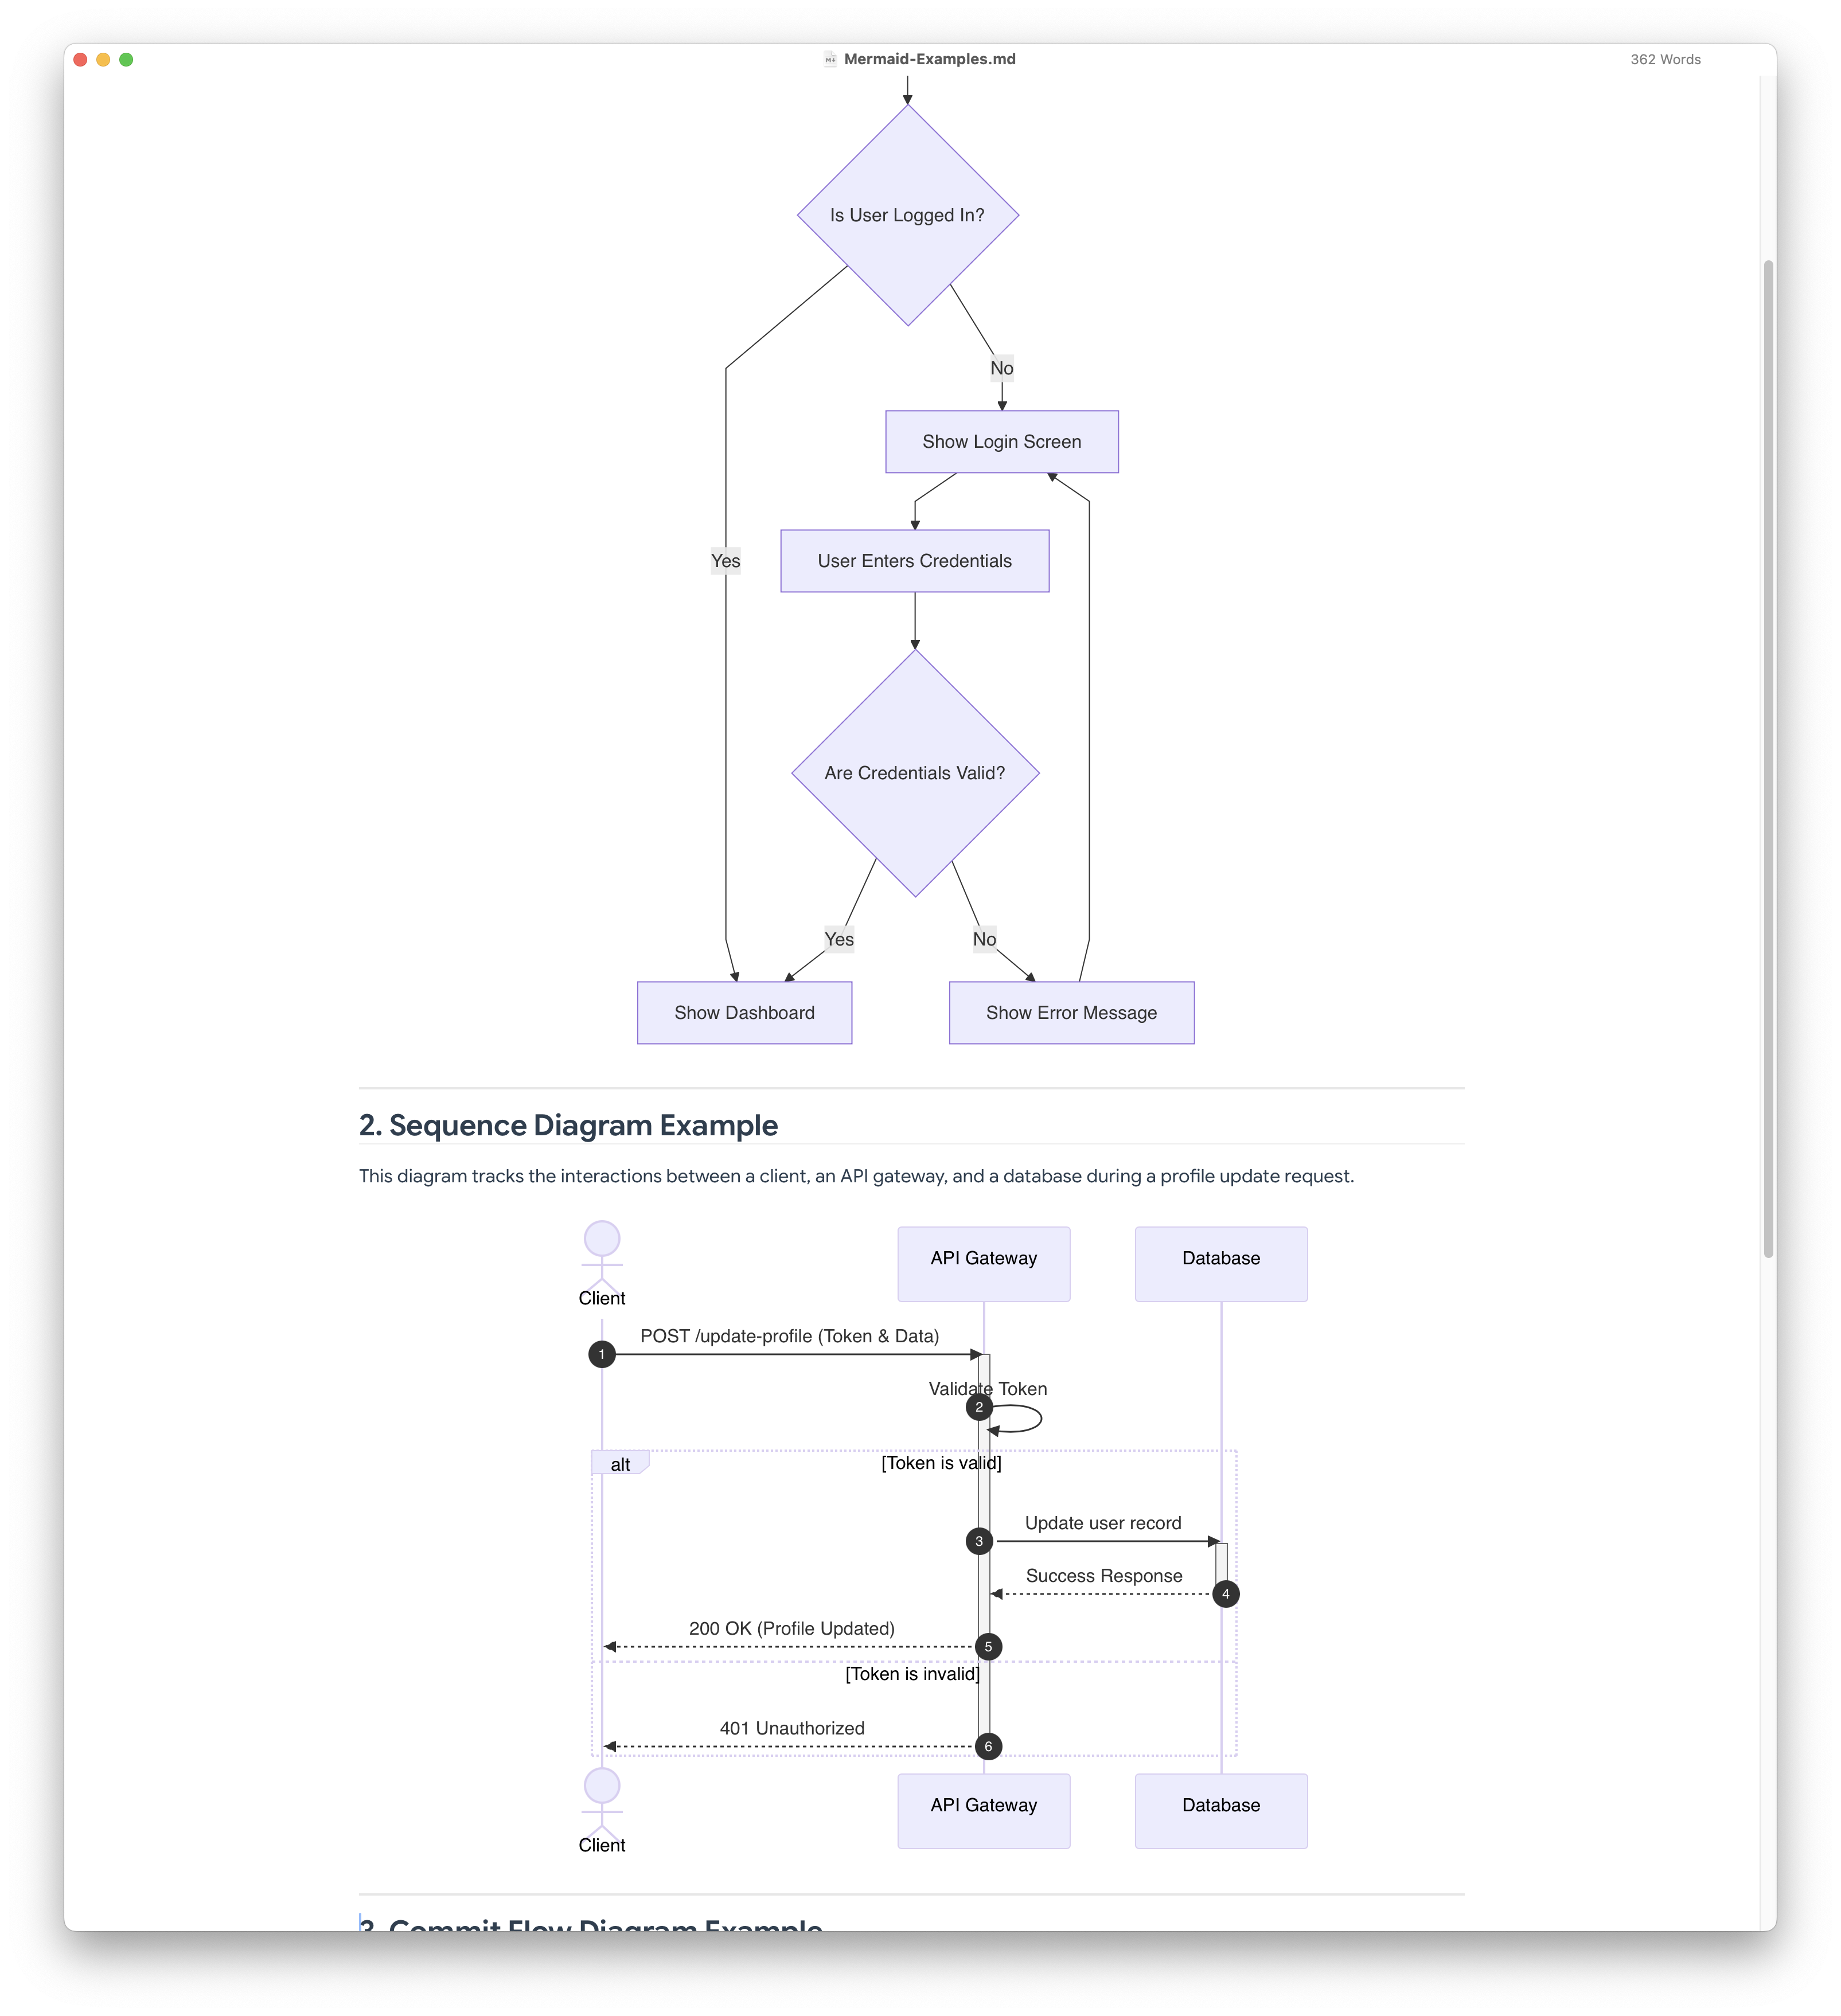
The following flowchart shows a typical user login and authentication decision tree. It uses a Top-to-Bottom (`TD`) layout.

```mermaid
flowchart TD
    A[User Opens App] --> B{Is User Logged In?}
    B -- Yes --> C[Show Dashboard]
    B -- No --> D[Show Login Screen]

    D --> E[User Enters Credentials]
    E --> F{Are Credentials Valid?}

    F -- Yes --> C
    F -- No --> G[Show Error Message]
    G --> D
```

---

## 2. Sequence Diagram Example

This diagram tracks the interactions between a client, an API gateway, and a database during a profile update request.

```mermaid
sequenceDiagram
    autonumber
    actor Client
    participant API as API Gateway
    participant DB as Database

    Client->>API: POST /update-profile (Token & Data)
    activate API
    API->>API: Validate Token

    alt Token is valid
        API->>DB: Update user record
        activate DB
        DB-->>API: Success Response
        deactivate DB
        API-->>Client: 200 OK (Profile Updated)
    else Token is invalid
        API-->>Client: 401 Unauthorized
    end
    deactivate API
```

---

## 3. Commit Flow Diagram Example

```mermaid
gitGraph:
    commit "Ashish"
    branch newbranch
    checkout newbranch
    commit id:"1111"
    commit tag:"test"
    checkout main
    commit type: HIGHLIGHT
    commit
    merge newbranch
    commit
    branch b2
    commit
```

------

## 4. Gantt Diagram Example

```mermaid
gantt
    dateFormat  YYYY-MM-DD
    title       Adding GANTT diagram functionality to mermaid
    excludes    weekends
    %% (`excludes` accepts specific dates in YYYY-MM-DD format, days of the week ("sunday") or "weekends", but not the word "weekdays".)

    section A section
    Completed task            :done,    des1, 2014-01-06,2014-01-08
    Active task               :active,  des2, 2014-01-09, 3d
    Future task               :         des3, after des2, 5d
    Future task2              :         des4, after des3, 5d

    section Critical tasks
    Completed task in the critical line :crit, done, 2014-01-06,24h
    Implement parser and jison          :crit, done, after des1, 2d
    Create tests for parser             :crit, active, 3d
    Future task in critical line        :crit, 5d
    Create tests for renderer           :2d
    Add to mermaid                      :until isadded
    Functionality added                 :milestone, isadded, 2014-01-25, 0d

    section Documentation
    Describe gantt syntax               :active, a1, after des1, 3d
    Add gantt diagram to demo page      :after a1  , 20h
    Add another diagram to demo page    :doc1, after a1  , 48h

    section Last section
    Describe gantt syntax               :after doc1, 3d
    Add gantt diagram to demo page      :20h
    Add another diagram to demo page    :48h

```

See the [Mermaid documentation](https://mermaid.ai/open-source/intro/) for more information.

There’s a number of sites that have information and tutorials on Markdown (e.g. https://www.markdownguide.org/getting-started/ or https://docs.github.com/en/get-started/writing-on-github/getting-started-with-writing-and-formatting-on-github/basic-writing-and-formatting-syntax).

Typora is just one of several Markdown editors. Some IDEs even include Markdown support either via plug-ins/extensions or via built-in features. Check the manual of your favorite IDE to see if Markdown is supported.

Note: Some of these examples are from sites like Mermaid AI or are from searches on Google Search.

Update: You might also be interested in this Markdown editor that’s similar: MarkText. It’s open-source and has many features.

Static IPs From DHCPD In VMware Fusion

Most of my virtual machines for VMware Fusion use NAT for networking to avoid conflicts with external IPs.  However, by default, you only get dynamically assigned IPs albeit almost the same IP for each VM you run.  What I want is a real static IP assigned for each VM.

I navigate to the following directory using the bash shell in the Terminal screen:

    /Library/Application Support/VMware/vmnet8

If you do an ‘ls‘ to see the contents of the directory, you’ll find a file called dhcpd.conf.  (Note:  Your installation may have a different vmnetx directory.  Just make sure you do get to modify the right one.)  It is this file that we’re interested in.  I edit this file and add some entries to enable static IP assignment for each VM I want to have a static IP:

# Configuration file for ISC 2.0 vmnet-dhcpd operating on vmnet8.
#
# This file was automatically generated by the VMware configuration program.
# See Instructions below if you want to modify it.
#
# We set domain-name-servers to make some DHCP clients happy
# (dhclient as configured in SuSE, TurboLinux, etc.).
# We also supply a domain name to make pump (Red Hat 6.x) happy.
#

###### VMNET DHCP Configuration. Start of "DO NOT MODIFY SECTION" #####
# Modification Instructions: This section of the configuration file contains
# information generated by the configuration program. Do not modify this
# section.
# You are free to modify everything else. Also, this section must start
# on a new line
# This file will get backed up with a different name in the same directory
# if this section is edited and you try to configure DHCP again.

# Written at: 03/21/2010 10:15:52
allow unknown-clients;
default-lease-time 1800;                # default is 30 minutes
max-lease-time 7200;                    # default is 2 hours

subnet 172.16.167.0 netmask 255.255.255.0 {
        range 172.16.167.128 172.16.167.254;
        option broadcast-address 172.16.167.255;
        option domain-name-servers 172.16.167.2;
        option domain-name localdomain;
        default-lease-time 1800;                # default is 30 minutes
        max-lease-time 7200;                    # default is 2 hours
        option routers 172.16.167.2;
}
host vmnet8 {
        hardware ethernet 00:50:56:C0:00:08;
        fixed-address 172.16.167.1;
        option domain-name-servers 0.0.0.0;
        option domain-name "";
        option routers 0.0.0.0;
}
####### VMNET DHCP Configuration. End of "DO NOT MODIFY SECTION" #######

host mesmer {
    hardware ethernet 00:0c:29:95:20:3d;
    fixed-address 172.16.167.4;
    option domain-name "hq.linuxunbound.com";
}

host spock {
    hardware ethernet 00:0c:29:bf:2e:05;
    fixed-address 172.16.167.5;
    option domain-name "hq.linuxunbound.com";
}

host starscream {
    hardware ethernet 00:0c:29:2e:ab:d6;
    fixed-address 172.16.167.6;
    option domain-name "hq.linuxunbound.com";
}

host beaker {
    hardware ethernet 00:0c:29:34:1c:7e;
    fixed-address 172.16.167.7;
    option domain-name "hq.linuxunbound.com";
}

host tomahawk {
    hardware ethernet 00:0c:29:ca:37:14;
    fixed-address 172.16.167.8;
    option domain-name "hq.linuxunbound.com";
    option host-name "tomahawk";
}

Note above that I extracted the Ethernet addresses from /sbin/ifconfig while the VM was running.  Also note that the entries I made were done after the end of the “DO NOT MODIFY” section.  In the last entry for host tomahawk, I added the following entry to let DHCPD assign the hostname automatically:

option host-name “tomahawk”;

After adding everything in dhcpd.conf, I shutdown the VMs running properly and quit VMware Fusion completely.  Then, back in Terminal, I change directory to

    /Library/Application Support/VMware/

and execute the following command:

    sudo ./boot.sh --restart

The above command restarts the processes (such as DHCPD) needed by VMware Fusion to properly run the VMs.

I then start VMware Fusion once more and run the VMs.  Each VM that was specified to receive a static IP in dhcpd.conf does indeed get the right IP.